Counter


View My Stats
Visar inlägg med etikett Crafting. Visa alla inlägg

onsdag 17 mars 2010

Gauntlet #1

Finally - pics of my gauntlet mounted on my leather glove! Enjoy!


Before and after.


The glove allows excellent movability...


...plus nimble-fingerness...


...and rock and roll!

måndag 27 juli 2009

The tent is finished!

It was a lot of work but we finished the tent a couple of months ago. I haven't got around to post anything about it yet, be here goes.

At present, Albrechts bössor have three smaller tents and two bigger ones. All of them is made by triangles sewn together. The bigger ones aren't much bigger than the smaller ones, but the difference is everything; there is much more space in the bigger ones. You can actually keep your equipment at your bed.

We recently found out however, that we need some sort of device for shutting the tents - when it's windy the flap that forms the "door" is really out and about. Let's see if anyone will make it happen...

fredag 1 maj 2009

Woodworker, Episode 2b


I revised my schematics with approximate measurements, some construction details and a sketch of how the lid and the floor are supposed to be constructed. The floorboards are not joined together - they will be put into a groove cut along the nether part of the chest walls, and will be supported by underlying beams slotted into the leg boards.

söndag 26 april 2009

Woodworker, episode 2

Now I have made enough progress to present some more of my attempt to make 14th century chests (I am making 2 - one for me, and one for my wife).

The chests are based on a typical "hutch chest design", where the legs of the chest are actually part of the sides of the chest itself. It's a bit difficult to explain, but I'll make a try with a pic. I mentioned before that I am not a craftsman, and before you judge me, I would also like to state that I am not an artist either. Nevertheless - I am damned proud of the above pic. It is the schematics I should have had before I started to work on that chest. I never thought I could make something as accurate as that picture, and it gives me good hope that I am not that useless when it comes to arts and crafts after all! Sometimes I despair, of course, like when I look at my good friend Alex's stuff. He's like:
"Oh, I just made it last evening. It took me a couple of hours. I'm not particularly happy with it, but it does it's job." When I try to make something the like, I usually end up in a sweaty, swearing heap with a headache - after about two weeks of planning, preparations, work and mistake after mistake.

When I was at my first reenactment event, the summer of 2003 in Azincourt, France, I met a group reenacting Burgundians of the mid 15th century. When I saw their stuff I was astonished, and when I had some time alone, I cried a bit, and wanted to go home. I was so proud of the clothes I had managed to tack together, and it all went to dismay when I saw their heavenly outfits. "HOW!?" I asked myself. "How can they produce such fine stuff? I will never ever be able to sew clothes that are half as good."

But then I started thinking a bit, and came to the conclusion that these Burgundians had started out just like me - without anything to wear at all. And they had also made mistakes. Several hundreds. Maybe I can't be just as good as they, but I am steadily growing better at everything I dare to try. Even though I despair, and doubt my very craftsman-foundation from time to time, that thought is comforting, and keeps me on my feet when I feel worthless. Everyone has made countless mistakes, and very few are actually happy with what they make; my friend Johan has made more things than I can even imagine, but he still says he's been happy with only two of them. And one broke in Italy last year (the irony!)... On my own part, I am at my fourth panzar/gambeson, and as soon as I'm finished, I'll make a new one. Hopefully, the fifth will be the last, as I have now made most of the possible mistakes when stitching gambesons.

Oh well. Back to that chest. To this day, I have joined the boards of the gables and the long sides together, with strips of wood fitted in grooves in the edges of the boards.

The picture on the left, shows what I am talking about. Next step will be to make grooves in the edges of the chest legs, to fit the joint tongues of the walls, thus putting the chest together.

I worked the joint tongues with a plane to bevel them, mostly to make them fit but also to make it look good, and made with care; the bevelled bit won't be visible from the chest outside - it can only be seen when opening the chest, and most probably I will be the only one doing that. It is a lot of work for no one to see. I didn't even have to work them with a plane at all (and that was solid pain and sweat) - I could just have made them simple and straight, as I leave the other side of the joint tongue. It would have been period anyway. Silly me. The picture to the above left shows how the worked joint tongue looks (and the picture below shows the un-worked side - the one that will be visible from the outside. It will hopefully fit in nicely in the chest leg.

The gables won't be worked at all. A wide groove (at least in comparison) will be made in the flat of the legs, where the gables will be fitted. They will be fastened with wooden dowels. This means that I will be almost finished in a couple of weeks (not in time for Morimondo, Italy, though...). Apart from the lid. And the bottom. And the hinges. And the lock (OK - hinges and lock are made by blacksmiths I know - I wouldn't want to try making anything as important by myself - at least not this time). Anyway. I can see the light in the end of the tunnel. More coming up as I go along!

torsdag 16 april 2009

I am a tent maker, episode 3

During easter celebrations we set out to finish what we hadn't - we wanted to finish that tent. Simon, me and Elisabeth gathered at Lunda's place. He and his wife Ann-Sofie were friendly enough to welcome us into their home - even though it was Ann-Sofie's birthday. As a birthday gift, me and Eli brought her hand dyed yarn.

We figured we were about half-finished with the tent, and started stitching about 10 in the morning, aiming to work during the night if we had to. We wanted so hard to finish before our event in Morimondo, Italy, in May.

Simon missed the bus and joined us some hours later, but apart from that, we all worked continuously during the day. Even Ann-Sofie joined the work force for a while - incredibly nice of her, as she is not into medieval stuff - yet :-). The picture to the left shows a grinning Lunda and Ann-Sofie (plus a freakishly big pile of tent), both working hard.

As the day progressed into evening, Simon pulled out a bottle of Bowmore to strengthen our weary spirits and aching fingers. We countered him by pulling out another bottle that we bought for his birthday some days before. This pic shows Lunda having a well earned dram.

As we were close to finishing the tent, we discussed the matter of an earlier mistake - when we first cut the pieces for the tent, we made them way too long. They were supposed to be 280 centimetres long, but due to a misinterpretation of a sketch, we cut them 350 centimetres long instead. We brought the nearly finished tent out in the dark yard to test it. Me and Lunda had gone scouting for a centre pole earlier, and with the help of Ann-Sofie's family (they were there for the birthday dinner - I cooked fish soup for the occasion), we managed to raise the tent to see how if our mistake would make it look silly or "wrong". We decided that it was a bit too pointy, and we went back to cutting fabric again. Next pic shows Simon measuring to cut another piece.

That extra piece was too much for us. We worked until 11 in the evening, and decided to call it a day, even if we were not finished. Me and Eli took it home to finish it. Perhaps Lunda will join us some weekend to help. Otherwise, it's not much left - we will fix the top part of the "roof" and hem the bottom. We figure it will take us 10 or 15 hours more work, but then it will be finished - and it will be roomy enough to shelter more or less all of the guys in Albrechts Bössor - and you, if you decide to tag along!

torsdag 19 mars 2009

My cold weather coat


I have made a coat for cold watches during summer nights, or frosty autumn marches. The coat is based on two of the Herjolfsnes finds - the no. 45 and the no. 63, plus numerous representations of clothing with paired buttons. It is made from coarse, thick woolen cloth and lined with softer woolen cloth.

The garment is really based on the Herjolfsnes 45, above left of this text. I borrowed the pic (and the pic representing the Herjolfsnes 63) from this page:

http://www.personal.utulsa.edu/~Marc-Carlson/cloth/tunics.html
It really is a tremendous page. If you haven't visited it, now is your chance. And if the owner of the page gets mad at me for using these pics, I would be happy if he told me, so that I can remove them.

Now. Back to the no. 45. The construction, including the pocket slits, is more or less exactly like the no. 45. I chose to make long arms, though. I made the fake gores (seams sewn in the middle of other gores to make the impression that there is actually more gores than there really is), but I can't say that it made much difference, as it is barely visible. Never the less.

From the no. 63 (to the left) I borrowed the collar. I have never made a garment with a collar, so I thought it might make a nice change. However it became a bit too small - it nearly chokes me when I have it buttoned. Hopefully it will give way in time.

That is really the main problem - the coat is a bit too small. Because I was going to have a lot of gores and seams, I used 25 centimetres of seam allowance, because I wanted the coat to be roomy. When it was finished, I could barely button it though. But I hope that it will stretch as I use it, plus I could lose some weight :-)

Below are some pics of me in my spanking new coat and shoes. The hood isn't that new, although I made it last year.

Here is a closeup at one of the pocket slits. They are quite handy when you want your purse, or if you would like to grab your dagger quickly for some reason :-)


Closeup of the choke-collar. Note the colour of my face - it is starting to turn a bit blueish.


Close up of paired buttons upon a belly that grows fatter by each day in the office... Luckily, I've started excercising.


And lastly - here is me, with my shiny shoes, my hood, my spanking new coat and a spear, to ward of the wolves in the Kivik forests.


Finally - shoes!

And now - what you have all been waiting for: My shoes! It is not much to say, really. They are finished, and I am kinda happy with them, although I would like them to be just a bit more pointy. And next pair will.

onsdag 18 mars 2009

I am a tentmaker, episode 02

Of course we didn't start stitching until about saturday noon. It's so typical - when you set out to do something, it is always those little things that get in your way. We shopped a couple of beers and a lot of food, so that we could have a pleasant time while working; if it's anything you need when putting your back to it, it is proper food and drink.

The work force was a bit crippled, due to my daughter Isolde - one of us always had to keep an eye out for her. She loves the following:

- Knives (and other weapons)
- Every other little thing she can use to harm herself

It sounds really awful, but neither me nor my wife have actively encouraged her. She has found her way all by herself. It was not until evening, when she went to bed, that we could really start working. By then Lunda had joined us, and we were building up severe pressure in the kitchen of Simon's parents.

First of all, we measured up the cloth. The tent is made up by triangles with a base of 160 centimetres, and a height of 344 centimetres, so we started working on the floor, cutting the cloth into what we wanted. It was clear that these tents will be a lot bigger than our previous ones, which is a good thing. Now we will finally have enough space for everyone. And then the stitching commenced. And it went on until 2 in the morning...

We continued for some hours the next day, but the tent was only about half finished. That gives us the opportunity to meet again in april to finish it, and to have another fantastic time. Thanks guys, and Simon's parents, for a great weekend with excellent food, lots of laughs and good company.


fredag 13 mars 2009

Woodworker

On another note, I've finally started to work on a couple of chests. I bought the wood years and years ago - fine oak from the northern parts of Skåne - and thanks to Daniel of Fraternis Militia Carnis, who is a woodwork teacher at a school nearby, I have access to a fully equipped workshop. Furthermore, he can advise me when I am about to make terrible mistakes - as you all know, I am not a craftsman, so these mistakes do happen, more often than not.

I have been shaving about 50% of the planks (no, not with a razor but with a plane - not a flying one, but one that you use to make wood smooth), and they look severely nice. I am content the chests will be really sweet as soon as they are finished.

Magnus, also from Fraternis Militia Carnis, has been nice enough to show me his thoughts on construction. He and I looked through about a 100 pics of chests from my PC, and then we shared ideas. As he seems to be better at "constructive thinking", he eventually sketched up a blue print for our chests. Both his and my chests will be constructed in a similar way, so it was good to have the opinion of someone more "crafty".

There is a lot of work to be done when building a chest, I'll tell you. I'll be posting some pics now and then, as my work progresses. Stay tuned!

I am a tent maker, episode 01

Today I am leaving town to go with some of the other guys of Albrechts Bössor to the small town Kivik, which is located in the absolute south of Sweden. We are going to hand-stitch a new tent at Simon's place. The guys in the "northern section", around Stockholm, are going to do the same, which means that we will finally have lots of space when going on events.

I searched high and low for good fabric, and I finally found a sturdy, white linen. It is cloth for making sails, more or less, and will live through most weathers.

We will be making the same old tents that we alreday have three of. They are called bell-tents by some. They resemble a teepee, and they are the only tents, except for regular pavilions and some other tent types with a frame, that I have seen during our period. There are LOADS of pics of pavilion, but more or less NO pics of tents of smaller type - soldier's tents. We feel it would be inapropriate if common soldiers lived in a pavilion; lots of things point to that tents weren't very common at all during the 14th century, even for officers. It is more likely that soldiers took shelter where ever they could, and if they didn't find a roof, they would simply sleep under the sky, wrapped up in blankets. That is my opinion.

But. As most reenactors are utter weaklings (including me and most of my friends), we choose to have tents. And to make it credible, we only have tents that we could transport ourselves. This makes the teepee-tent ideal for our needs, as it is very easy to put up and to put down, and it is light to carry. There is no need to bring the center pole; as long as you know how tall it needs to be, you can simply grab the nearest fence pole of appropriate length and - voila!

I have been looking forward to this meeting a long time now, and it will be glorious to meet the guys again. I have a feeling it will be a great weekend, filled with good friends, laughter, stitches, hard work, sweating, snapping needles, swearing, cursing and at least five different "I hate this crap! I give up! I'm going home!". Then again - there will be pizza and beer... And I will be getting away from Växjö for a while :-)

fredag 10 oktober 2008

New suede(?) shoes, part 4

It was time to make the other shoe. Djävulen was postponed into the future, so I didn't feel stressed anymore. I took my time making the other shoe while watching bad movies and drinking loads of tea. I started up by flesh-edge-stitching the two parts of the overleather together, placed like in the pic below.


When I was finished, it looked like the picture underneath (for clarification, please have a look at the previous post).


Next, I started to saddle-stitch the sole to the overleather, not forgetting the so called rand, a strip of leather placed between the sole and the overleather. The rand is used to make the shoe more stable as well as protecting the overleather from being worn out, as the wearer often treads on it, and to provide extra water proofing. In the pic below, the rand is marked by a red arrow. Don't forget to get the layers all right - the shoe is about to be turned inside out when you are finished! It is mind bending and tricky business, which requires quite a bit of thought.


This time the overleather seemed to be a bit too small. I can't imagine how this is possible, as both sole and overleather on both shoes were cut from the exact same pattern. Still, it happened, and I had to really struggle, and bend the sole to get it together.


When the shoe was all put together, I tunnel-stitched strips of reinforcing leather to the edges, where the lace holes where to be put. Tunnel seam is similar to flesh-edge-seam, with the difference that you don't allow the awl to go out through the leather edge - you rather make sort of a tunnel in the leather, not going through to the outside of it. Bah. The pic will illustrate:


When this all is finished, it is time to soak your shoe. This is done to soften the thick sole, and to make the overleather more pliable - otherwise we wouldn't be able to turn the shoe at all. Just let it soak over night.


The next morning, hell awaited. I removed all children, cats and elderly people - the air was about to thicken by coarse language and burning curses. It is a true feat to turn a shoe, and it requires strength and patience.


I worked it for maybe 45 minutes. My muscles ached, my hair was all over my face, I was sweating and my throat was sore from grunting and swearing. I used a broomstick and a shaft to a mace, but the leather would hardly budge. I thought I was getting somewhere. And then:


The bastard broke! @£#¤$%%& - as they say in magazines...

torsdag 9 oktober 2008

New suede(?) shoes, part 4 - coming soon!

After a heap of trouble, I finally managed to finish my other shoe. A story about the making, and pics to illustrate it, along with artsy photos of the finished pair, will soon be posted!

måndag 22 september 2008

New suede(?) shoes, part 3

Lets try it again. I'll just post a lot of pics, and then I'll comment on them in the bottom.


The first picture shows the tools of the trade. There is a ruler for measuring and drawing straight lines (who would have thought that you could do that with a ruler?), harness needles (they are blunt - not sharp - for a closer look, check out the second picture), waxed linen/flax thread - the really sturdy type, a sharp, thin awl, a thimble ring and a sharp (really sharp) knife. I also use some type of material to protect the table from cutting and piercing - a chopping-board usually does the trick.

Next picture shows the harness needles. They are blunt, and they are two! They are blunt, because they are not used to pierce holes in the leather. The awl is used for that. The needles are used to guide the thread through the holes. They are two because you make turn-shoes by stitching them together with a so called saddler's seam, where two needles are used for the same thread - one needle in each end. The saddler's seam is presented further down this post.

Next picture shows the three different pieces of the shoe in question. There is a overleather (1), a gore (2) and a sole (3). The colour markings show where they fit together. The construction is a bit tricky, and it is easy to get lost when trying to figure it out. I stitched the gore in place at the overleather (green to green and red to red - yes - it takes a whole lot of folding and shaping to get it straight), before I did anything else.

Next two pictures show a piece of the sole. The awl goes in at the top, but it doesn't go the whole way through it - it changes direction, and goes out on the side - the sole is thick enough for this. The reason for this is that the thread would be worn out (off?) in less than a day if it were to be placed directly under the foot (between the foot and the ground).

Next two pictures show how the above is made in practice. This example shows awling technique for a so called flesh edge seam, which is the most common seam for stitching together pieces of the overleather. The thread is not seen on the outside when the seam is finished. The only difference between the flesh edge seam and the saddler's seam is that the flesh edge seam really only goes through the edges of the leather, when the saddler's seam can go straight through the leather, from top to bottom.

The next picture is a detail of the flesh edge/saddler's seam. Both needles go in (one at a time) the two holes made by the awl, one from each side. When each needle has been pulled through, you just tighten the thread, and go for the next set of holes. The last picture shows how the flesh edge seam looks.

When stitching the overleather to the sole, the saddler's seam is used.

torsdag 18 september 2008

New suede(?) shoes, part 2

As I promised, I'll post more on the making of these godly vessels of foot protection.

In the beginning, there was the foot. Plain, smelly and rough. Thereafter I put one of my hose on it, and after that, a real thick winter woollen sock. I finished with a tube sock over it all. I then had a very warm foot.

Next step in this footy ordeal, was to take 1o centimetre long strips of gaffer tape, and completely cover up my foot - not too tight though. I was trying to follow the structure of it all, not of the foot inside all the socks and tape. When I was finished with it, I looked up a nice shoe in the Shoes and Pattens book from London Museum (I recommend you do this beforehand), and used a marker to sketch the cutting/outline of that shoe on my gaffer taped, socked foot.

What I did next was to gently make some room between the tape/tube sock layer and the warm winter sock, and used a pair of scissors to cut the tape/tube sock away. When I did this, I cut along the lines I made with the marker, quite obviously.

When I was finished doing that, I had the pieces cut out for a gaffer tape shoe. Then it was time to trace my foot for the sole. I put my hose-clad, but otherwise liberated, foot on a piece of paper, and traced it down with a pen. Next time, I'll be sure to trace it further under my instep, so the sole gets that classic narrow cut in the middle of the foot. Anyway. When it was finished, I measured the whole thing, and compared it to the measurement of the overleather. They should of course be the same, otherwise they won't go together. It is easier to adjust the sole than the overleather.

When they fit together it is time to re-sketch the again. Make the toe a bit longer on both the sole and the overleather, and make the shoe as a whole bigger by maybe a centimetre on all sides.

Then re-sketch it on a big sheet made of gaffer tape, cut it out, and whip stitch it all together loosely with thick, durable thread. The gaffer tape works a bit similar to leather, and when you are finished, you have a good mock up shoe. Try it on, and adjust if too big or too small. Remember that the leather you will be using should be much thicker than your tape mock up, and that means it will also be closer to your foot. If the mock up is just a tiny bit too big, then it is probably OK. When you are happy, trace it all down on paper, and you have your personal shoe pattern!

I'll describe more of the making as soon as I start with it.

onsdag 17 september 2008

New suede (?) shoes - pics

And now: What you've all been waiting for! The lace holes haven't been made yet, and I'm currently adjusting to a new camera - i.e. focus on these pics might not be the best. I hope you can see it anyway.


tisdag 16 september 2008

New suede(?) shoes, part 1

As my old shoes, made in january 2004, have been stepping closer to death each event, I have often thought of making myself new ones, in thicker leather, in a different model and with more correct techniques. But I think a lot, and do a whole lot less. No new shoes have been made - I have rather turned them inside out and fixed the as good as I could. But on our last event in Seeth-Ekholt it was finally time to let them go to their final rest. I ripped the leather off the soles (its not the soles that are falling apart - I'll re-use them some other place), and buried them peacefully in a hole we dug in the ground (not for the shoes, though, but for our kitchen waste). There they await the archaeologists of the future, who will have a real hard time telling 21st century from 14th :-)

So I really, really need new shoes. I bought the leather some time ago, but I really haven't got around to it. You know how it is. The problem is, that Albrechts Bössor, our company, is arranging what we call En djävul i skogen, translated "A Devil in the forest" - for short we will call it Djävulen (The Devil) henceforth. Djävulen was originally put together to test out ourselves and our equipment. It consists of one or two days march through the forests, carrying every single piece of equipment the company would need on campaign - including armour, pavise shields, weapons, cooking equipment, tents - the lot. We use a couple of sumpter horses to carry the bulkiest stuff, but otherwise, we carry our shit ourselves. And we walk. And walk. And walk. Then you'll need a sturdy pair of boots, and as Djävulen is coming up in less than a month I thought I might have to fix me that pair of shoes.

So that's what I am doing at the moment. The shoes are based on a London find, with details lent from similar Swedish examples. I turned the first of them yesterday night, with the help of a hammer, a broom stick, coarse language and my wife. What remains is making lace holes - no big deal. I am really, really happy with the first one - it might be one of the best things I ever made (apart from the leather just being a tiny bit too small at the instep - it leaves a small hole just above the sole - excellent for letting in water, snow and muck. Yes, I have already cut the other leather - exactly like this one. I guess I'll just have to put a patch there). They fit better than I thought, but in spite of them being a bit small at the instep at the level of the sole, they are a bit too big farther up the shaft. I know what changes I will make when I cut my next pair, if I ever get around to it. I will post pics as soon as I get back from work, and I'll post comments on the making of the next one, so you in your turn can comment on all the mistakes I make.

onsdag 13 augusti 2008

Knappast

Igår sydde jag på den sista knappen på livstycket till panzaret. 31 stycken, en mer än jag räknat med. Sakta men säkert börjar det ta form! Det känns tillfredställande att det äntligen börjar se ut som ett plagg och inte bara en massa tygstycken, men samtidigt känns det lite hånfullt - det är först nu - när jag gjort alla misstag - som jag kan påbörja mitt "riktiga" panzar. Och redan står det mig upp i halsen... Jag får nog jobba på lite andra grejer först, innan jag kan ta tag i det.

Jag läste häromdagen om ett panzar från Edward IIIs inventarier som skulle vara gjort i grön canvas. Allt jag vet om linne och hampa (och därmed om canvas) är att det är väldigt svårt att färga med någon reda, så att det inte bara bleknar. Hoppas att Maria har några färgaress i klänningsärmen - jag vill ha ett grönt canvaspanzar!

Annars funderar man ju på varför de panzar som avbildas alltid är så färgglada - jag menar; det är inte bara riddare som springer runt i grälla panzar, utan även soldater, så silke är det väl rimligen inte, i alla fall inte alla gånger. Och växtfärgad linne/hampa är som bekant notoriskt bleknande i väder och vind. Återstår bomull (men jag vet inte hur det beter sig i färgningen), läder eller ylle. Ingenstans talas det om att det yttre lagret är gjort av ylle. Det finns tveksamma belägg för att läder skulle använts i panzar/jacks, men frågan är om det användes ytterst. Och i så fall, om bomull beter sig bättre i växtfärgningssammanhang, borde det vara det som är ytterst, även om det fortfarande måste anses som ganska dyrt.

Så här säger

Armourers company of london, 1322:

"it was ordeyned for ye comon proffyt and assented that from henceforth all Armour made in ye Cytie to sell be good and concenable after ye forme that henceforth That is to saie that an Akton and Gambezon covered with sendall or of cloth of Silke be stuffed with new clothe of cotten and of cadar and of olde sendall and not otherwise. And that ye wyite acketonnes be stuffed of olde lynnen and of cottone and of new clothe wth in and wth out. It is ordeyned that all ye crafte of ye citie of London be truely ruled and governed every person in his nature in due maner so that no falsehood ne false workemanshipp nor Deceipt be founde in no maner wise in any of ye foresaid crafte for ye worship of ye good folke of all ye same crafte and for the common proffytt of ye people".

"Olde lynnen och olde cottone" står i motsats till "new clothe, wht in and wth out", så det skulle kunna vara så att man har gammalt bomullstyg/linnetyg som stoppning och nytt på utsidan och insidan - och kanske skulle det kunna vara så att det är enklare att färga än hampa och linne. Vad beträffar "wyite acketonnes" så känns det inte som om det är särskilt vanligt - av alla de bilder på tygrustningar jag sett från 1300-talet finns max fem bilder som avbildar vita dylika. Så många var nog färgade.

Jag borde använda någon annan stoppning i mitt kommande panzar - det finns mig veterligen inga belägg för att ylletyger i flera lager använts som stoppning. Jag får helt enkelt skaffa mig råbomull eller linblånor som jag får lägga i lager, eftersom jag mer är ute efter en vaddering än ett fullgott skydd a'la jack (med en massa, massa linnelager). Det verkar vid första anblicken bra mycket mer komplicerat att använda än lager av tyg, men kanske inte. Om man kardar det till stora sjok och lägger sjok på sjok, kan man på ett mycket enkelt sätt justera tjockleken på stoppningen på olika ställen, till exempel under armarna och i armvecken. Det är hur som helst värt att undersöka! Jag har förresten hört två olika saker om stoppningen i Svarte Prinsens panzar, och det ena är att den är stoppad med ull och det andra är att den är stoppad med råbomull. Undrar just vad det egentligen är...

Men. Canvas ytterst och ull (urk så varmt) som stoppning. Linne innerst. Då är man nog jävligt svensk... Och jävligt varm. Men kanske inte mycket varmare än om man stoppar panzaret med filtar. Linblånor! Där har vi det! Om fem år kommer ni att få se resultatet här. Stay tuned!

---

English summary:

This is solely a discussion with myself on how to dye and construct a gambeson... What to stuff it with, which colors could be used, what the outer layer is made of, as the gambesons often are depicted in bright colors that are hard to get when dyeing linen and hemp (silk, wool, linen, hemp, cotton, leather?). Any suggestions?

måndag 11 augusti 2008

Tyskland kryper närmare

Idag hade vi en sista kontakt med arrangörerna för Seeth-Ekholt. Det visar sig att en av dem ligger på sjukhus, men det verkade inte vara något allvarligt. Vi åker på fredag morgon, tidigt, tidigt. När vi kommer på plats finns mat till oss, det har de ordnat, och sen är det bara korv, öl och schnaps för hela slanten. Jag ser mycket fram mot eventet, och hoppas att vädret blir fint. Och vi har fått barnvakt till Isolde! Det här blir det första barnfria eventet - någonsin. Känns det som. På ett och ett halvt år i alla fall. Tack, svärmor, för att du ställer upp! Det kan tänkas att det blir rätt bra med dricka och osedligheter, eftersom man inte behöver vara i stridbart skick dagen efter. Aaah! Livets väsentligheter i en hel helg - mat, dryck, avkoppling och samvaro. Det blir en kunglig fest! Trodde jag. Arrangörerna låter meddela att vi ska släpa med oss så mycket vapenbrak vi bara orkar. Adjö sötebrödsdagar - Goddag krigstrauma! Varför kunde de inte bara fortsätta med sitt mys och sitt hantverk? Varför ska de tvinga på mig panzar, muza ok plata? Allt jag ville var att leva Ferdinand - att ligga under nån ek, lukta på blommorna och dricka bärs. Men men. Sånt är livet.

Jag arbetar på med mitt panzar för fullt, och tycker att jag kommit långt med livstycket - jag räknar med att sy på alla knappar ikväll. Sen är det fållning och lite liknande krafs. Och så blir det förstås de där ärmarna... Jag tänkte arbeta med dem på eventet, och eftersom man inte har ett barn att hålla ordning på, kan man nog få gjort ett och annat. Kanske kan man räkna med sex timmars arbete om dagen? Eller i alla fall fyra - man vill ju inte slita ihjäl sig. Och på det viset har man bäddat för att kunna ha skiten färdig till nästa säsong. Jag tänkte göra dem tajta, med en "påse" runt armbågen för rörlighetens skull. Vi får väl se hur det blir; Maria får delge mig sina kunskaper och så gör jag som hon säger. Förhoppningsvis lär jag mig lite på kuppen.

---

English summary

This is about the final preparations for the trip to Seeth-Ekholt, and about my plans for making the sleeves of the freaking gambeson during the event. Maria could help me, as she is way better than I am.

fredag 8 augusti 2008

Panzarknappar och Sigmund Ringeck

Kvällarna här i den nya, och väldigt temporära, lägenheten fylls av studier av Johannes Lichtenauers manuskript, med Sigmund Ringecks dito som tolkningshjälp. Bägge två är översatta till engelska, annars hade man varit rätt rökt; min medeltidstyska är lite krattig, trots mitt snokande i Preussischer Urkundenbuch. Oavsett vilket är den gode Lichtenauer lite svår att tolka då och då - "Hier ist ain andere styk" blir inte mer begripligt på engelska, eller för den delen på svenska - "Detta är en annan teknik". Och så inget mer. O-K. Det är minsann inte det lättaste att lära sig fäktas ur en bok, än mindre när författaren bara skriver att det rör sig om en annan teknik, utan att ens nämna något om den i övrigt. Då är Sigmund Ringeck bra att ha. Han beskriver saker och ting lite mer utförligt, men ändå inte så detaljerat som man skulle vilja - det är så gott som alltid ganska stort utrymme för tolkningar, och det innebär att det kan bli ganska galet i slutändan.

Nå. Det är hur som helst ganska vilsamt att sitta där och grunna, och det är ärligt talat inte mycket mer att ta sig för i en liten studentcell utan möbler. Utom att sitta och sy tygknappar till sitt hägrande panzar. Nu när knapparna är färdiga, så när som på fyra stycken, börjar det slutligen slå över mot "halvfärdigt" snarare än "näppeligen påbörjat". Igår sydde jag 16 stycken i ett grovt, repande linne/bomullstyg. Fingrarna förlamas av allt slitande, ryggen böjs i krum av min dåliga arbetsställning och jag har tusen andra saker att stå i, hellre än att sitta där med skiten. Men nu har jag 4 knappar kvar av de 70 jag ska sy. Det känns skönt. Nu ska jag bara konstruera ärmarna och klippa ut dem, kvilta dem och sy knapphål. Och sy fast knapparna. Och sy knapphål för livstycket. Och sy fast de knapparna. Och ordna fållarna överallt. Det är nog bara nån veckas arbetstid kvar på den, förutsatt att jag då jobbar 8 timmar om dan med skräpet. Och så vet jag redan nu att jag inte kommer att bli 100% nöjd med den, trots att Maria ska hjälpa mig med ärmkonstruktionen i Seeth-Ekholt.

Till skillnad från mina tidigare fungerar den att ha på sig. Den är inte för tung, och den passar mig. Däremot gjorde jag det klassiska misstaget - jag gjorde alla stycken lika stora, vilket innebär att det yttersta lagret är för litet. Således måste jag sy på remsor längs sidorna och längs ryggen för att inte stoppningen ska synas. Det känns inte riktigt bra, eller rättare sagt: Det irriterar mig som bara den. Och just därför måste jag sy mig en ny, men det är tamejfanken ett senare projekt. Just nu spyr jag nästan på skiten. Hoppas att någon kan ha glädje av den i alla fall - kanske för testhuggning, eller som bränsle :-)

---

English summary

This post is about my gambeson, and how much I hate working on it, as I know even now it will not be as I planned. So I will make a new one, based on a German effigy. Furthermore I write about Sigmund Ringeck and Johannes Lichtenauer - manuscript fencing. But mostly it is about the never ending work with the gambeson.

torsdag 7 augusti 2008

Inför Seeth-Ekholt

Idag är det en vecka och en dag tills dess att vi i Bössorna drar iväg till Seeth-Ekholt, sommarens sista "externa" event. Det äger rum i norra Tyskland, en handfull mil norr om Hamburg. För fräschhetens skull är det ett arrangemang fokuserat på hantverk och handel, snarare än fajting. Jag gillar att härja med bössor och spjut, men det är rätt gott att bara sitta ner och äta korv och dricka tysk-öl (eller Trave-öl som det kallades under 1300-talets senare hälft och kanske tidigare/senare också, vad vet jag?) och peta lite med smågrejer, utan att behöva freda strupen från blodtörstiga polacker med svår attityd. Jag måste sy mig ett par nya skor, för mina gamla är verkligen oerhört trasiga. De har hängt med sen vårvintern 2004, och inte ens då var de mycket att hänga i granen. De är lagade och lappade åtminstone 3 gånger, men nu är ovanlädret så anfrätt att jag fruktar att de är bortom all räddning... Seeth-Ekholt verkar vara ett bra tillfälle för detta, men kanske borde jag sy färdigt mitt fjärde panzar där?

Jag har i stort sett ärmar och knapphål kvar, samt en del rent kosmetiska justeringar, men i övrigt kommer det att bli rätt fett. Jag har inspirerats av en fresk - italiensk (jag veeeeet - det är inte direkt 100% om man reenactar norra Europa, men fresken är från 1360-tal, och jag siktar på att ha utrustning från omkring 1380 - det är ändå 20 års skillnad, och man kan ju hoppas att modet hunnit hit på de 20 åren :-P). Jag kommer sannolikt att göra ett panzar till, och då i stort sett baserat på kopia av Peter Krieglingers TYSKA panzar från 1370-talet, med detaljer från bokillustrationer från 1380-1390. Och de är franska... Men vad fan gör man? Biblioteket brann ju ner, och redan innan det hände var vi ju helt enkelt back water här uppe i Norden, och det är vi än idag, med tanke på hur lite som egentligen publiceras/publicerats av den forskning som bedrivits. Titta bara på länken till Alsnöbloggen här till vänster - plötsligt finns det en bössa och ett förmodat fragment av ett panzar som dyker upp på scenen - och titta på Uvdalstextilierna från Norge sen! Hur länge har de legat i ett magasin, tro? Vad gör man? Kollar på tyska grejer, självklart, men även där finns regionala skillnader som gör att de i många fall inte är representativa för nordiska förhållanden under samma tidpunkt, och med tanke på hur få tyska sena 1300-talsmanuskript jag sprungit på är det kanske inte helt lätt.

Jag misstänker således att åtminstone 85% av de manuskriptbilder jag har är franska, och det kan bero på att fransmännen är bra på att publicera sina bevarade manuskript eller att det helt enkelt finns så oerhört mycket mer bevarat där. Eller en kombination av ovanstående förstås. Sannolikt. Det är klart att man arbetar mycket med Londonfynden, Herjolfsnesgrejerna och de få svenska skulpturer som går att använda - som inte avbildar helgon iklädda lakan, men för att få någon form av utfyllnad där pusselbitarna saknas måste man ju vända sig någonstans.
Så där kom den - min bekännelse. Mycket av min inspiration kommer av franska bilder. Men jag har bekänt, biktat och botat, så nu ska jag vara förlåten. Det hade för övrigt varit intressant att veta vad ni som eventuellt läser det här använder er av för källor. Posta kommentarer!

Nåja. Nu var det Seeth-Ekholt det egentligen gällde. På fredagen den 15 åker vi alltså till Wurst och Bier. Jag har lovat våra tyska kamrater inlagd sill, eftersom de av någon mycket märklig anledning är mycket förtjusta i det. "Utlänningar" (om uttrycket tillåts i dessa tider) brukar reagera precis tvärtom på konceptet inlagd sill, men i det här fallet älskar de det.

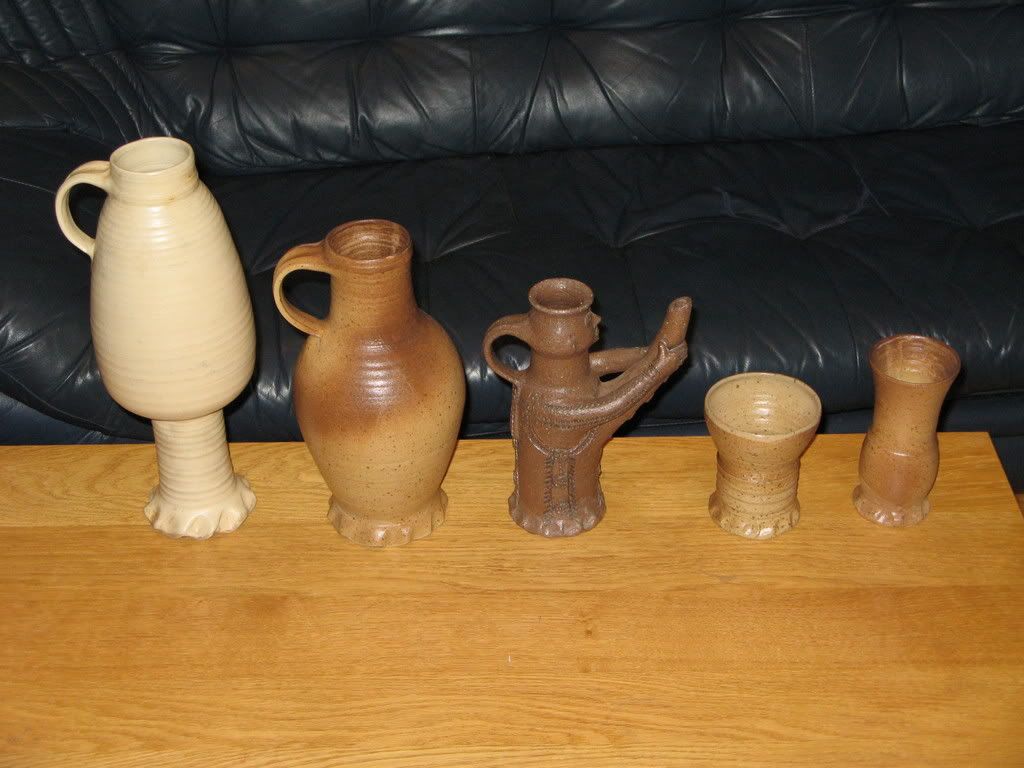
Eventet som sånt är som sagt ett hantverks-/handelsevent, med flertalet mycket duktiga hantverkare, bland annat en keramiker som gör förtjusande kopior av Rhenkeramik. Förra året handlade vi på oss en hel del, som synes här på bilden. Är inte kuk-kannan (eller KK som den kallas, eftersom vi ofta har barn med ute i fält) oerhört obscen?

Jag hoppas, trots mitt besvärliga ekonomiska läge, att kunna handla på mig lite mer keramik när jag är på plats. Det hade varit kul att få tag på lite nya grejer.

Förra året blev vi oerhört väl mottagna. Historia Peregrini (http://www.historia-peregrini.de/) som arrangerar kalaset, tog verkligen väl hand om oss. Jag tror knappt att det visste hur väl de ville. Vi fick mat, öl, vin, erbjudande om sovplats inomhus för barnens skull och ständigt beröm för vår utrustning och för hur coola alla tyckte att vi var. Man blev nästan lite förlägen; bra upplever jag inte att vi är, även om vi förstås är bra ;-)

Det var en härlig avrundning på en hektisk säsong 2007 och förhoppningsvis blir det så även i år, i synnerhet som vi inte har möjlighet att hälsa på våra vänner i Deventer Burgerscap (http://www.deventerburgerscap.nl/), Nijmegen. Gebroeders van Limburg-weekend är verkligen trivsamt, men på grund av bristande intresse blir det nog ingen av Bössorna som åker i år. Sorgligt men sant. Vi träffar i och för sig Deventer Burgerscap-gänget i Seeth-Ekholt, men jag är ärligt talat rätt sugen på öl, Advocaat och Genever! Jag får återkomma med kraft och bestämdhet nästa år!

---

English summary

This post is about my woes regarding my gambeson, its buttons and various sources to gambesons, and by all means everything else. I'm more or less forced to use European sources, with emphasis on French stuff, because the Royal Castle of Sweden burned down in 1697. In the fire more or less all medieval books were lost, so Swedish sources are kind of scarce... So - which sources do you all use? Please tell me!

The post was supposed to be about the Seeth-Ekholt-event, and it is, sort of. I'm looking forward to going there, as we can meet our friends from the Netherlands, drink good beer, eat sausages and shop fine pottery!